Writing The Second Draft

Documenting the Journey as I become who I want to be.

Archive for the tag “homemade”

Axe Sheath pt 1

At the end of this month is a very important date. The Teacher’s wedding.  Because of certain circumstances I will be one of the groomsmen (which I’m quite happy about). The theme is sort of a fantasy/medieval styled thing and so many of the groomsmen will be wearing a sword or other weapon as well.

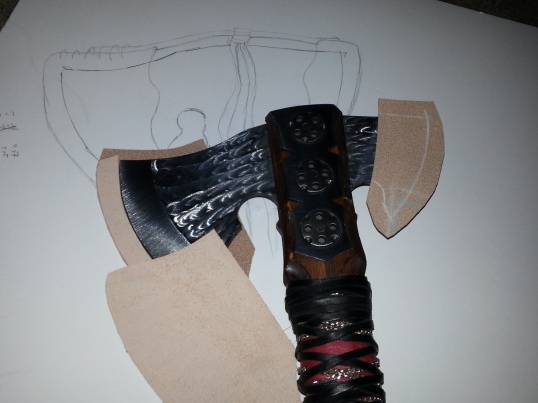
Personally, I don’t have any medieval style swords, but I do have a neat looking axe that I purchased at the Michigan Renaissance Festival.

Axe
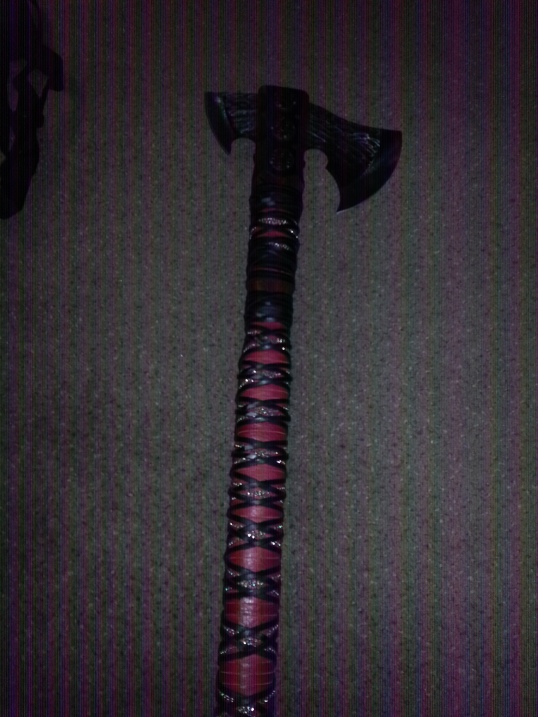
(Forgive the poor quality picture, I’ll replace it later)

It’s beautiful and would be perfect! Except that it’s sharp and the frog I have places it uncomfortably close (and the bottom part (not pictured) scraped up my ankle pretty bad). So, Solution? Make a sheath of course! I grabbed some tools and some leather off of amazon and planned it out with my brother!

Sketch

After the leather finally arrived I still wasn’t quite sure but now I’m in something of a time crunch so i need to get everything cut out so I can ship the axe down to The Teacher in time for the wedding!  My brother recently had his own wedding a few days ago so he won’t be able to help for this part of it however he did let me know I could use some of his old sewing supplies.  So I dug into that and gathered all the tools I figured I could use!

Tools

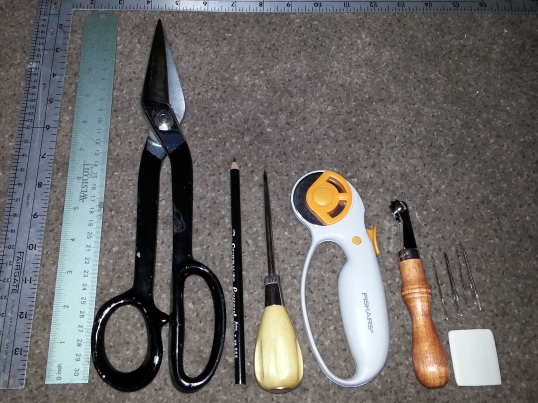
Here are all of the tools I’m planning to use, some mine some his. The ruler, pencil, awl, rotary cutter, stitching spacer, and needles are mine. Whereas the L-Square, big scissors, and soapstone are my bro’s. I haven’t used all of these tools yet, and I may add more but this is the list right now haha.

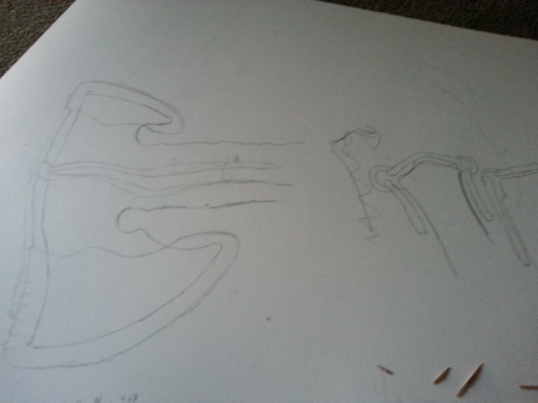
So I measured out the designs and started by cutting out a square that was around half an inch bigger than what I needed. Then I traced the shape of the blade onto the leather with the soapstone.  Once I had that I guestimated about an additional centimeter and drew freehanded the cutting lines. I checked it on the axe and started cutting!

Curves with the rotary cutter aren’t as easy as I’d hoped, but they’re a lot easier than using a box cutter like I did when I made my wallet. It didn’t seem to stretch out the leather at all and with a careful hand I ended up with my first piece ready!

First part

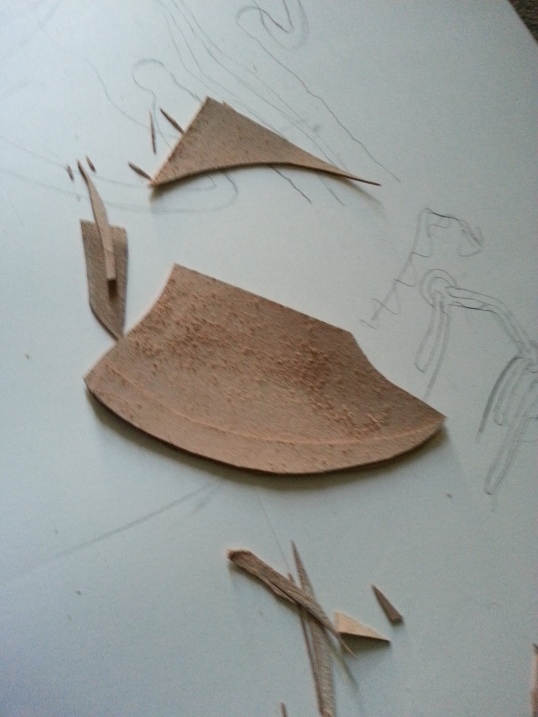
As you can see, I also added an additional part for the axe to cut into so it won’t cut through my stitches later on!

I took this cut out, flipped it over and traced it to get the second piece! Which was a little tougher to cut out, and i’m pretty sure it’s nto completely even as of yet but it was starting to get dark so I wanted to get another rough part done before I tried to do any fine work. It’s much easier to see things under natural light than the kitchen light so after I finished the first part for the second bit of my axe I called it a night.

pt1 Finish!

So next time I just have to fine tune some of the parts and make the final cutout for the second bit!  I still have some work to do with making a cover for the bottom weight but I feel pretty accomplished! After that I just have to figure out if I’m going to stitch it up with fake sinew, or waxed thread!Threads.jpg

I’ve never used either so i’m not sure what to pick…

So if you’ve got any insights please comment below! Have you ever had a project to make something like this? Medieval styling or otherwise? Feel free to post any other questions or comments, I’d love to hear from you!

Is it spring yet?!

Well, judging by the good 2feet of snow on the grass and the large mountains taking up several spaces in just about every parking lot, decidedly not so. But that’s not keeping me from getting the springtime garden-jitters.  I’m planning to move out of my pop’s house into an apartment in the middle of summer pretty much so at that point I’ll be pretty sol when it comes to garden stuff, but that doesn’t mean I can’t help out the step-mom with her garden endeavors!

When we moved into this house, they cleared up a nice 2×5 space behind the garage for foodstuffs, which is what I’m interested in. (Step-mom does have a butterfly garden as well as plants along the front and side of the house.  And while I intend to help in the planting and such of those I’m more interested in the food :U)  Last year when I arrived in august they had tomatoes, green peppers, and strawberries.  I don’t know if there was anything else earlier or not. I heard at one point they did squash and they grew across the whole yard!

So lately I’ve been thinking of what to grow this year, also thinking of what perhaps I could start in this house and take with me when I move, which of course means container gardening! I’ve already been looking into what foodstuffs can be grown in containers. I already have experience with greenbeans and cherry tomatoes from when I lived with my grandmother though I’ll be honest I’m not too fond of either of those. I’ll eat them (oh will I eat them) but they aren’t exactly my favorites P:  So I did a little research on what can be grown in containers vs what I like to eat and came up with the following list!

Basil
Beets
Bay
Chamomile
Feverfew
Garlic
Ginger
Lemon Balm
Mint
Oregano
Peas
Potatoes
Rosemary
Sage
Shallots
Spinach
Strawberries

I suppose you’ll notice the number of herbs kind of overwhelms the number of actual fruits or veggies but that’s because they take a little less room and are a little easier to grow indoors. At least, that’s what I’ve heard, I guess we’ll find out haha. Also I’ll admit I added a few of these because I love them in Tea (Lemonbalm especially) and for medicinal purposes (Feverfew helps headaches), and for general magic stuff (Rosemary and Sage for example).  Of course I don’t expect to be growing ALL of these, that’s 17 different pots and plants and I frankly just don’t think I’ll have the room or window space for all that.  Although I won’t know more until I have the apartment haha. But in the mean time I think I’ll just pick one and start there haha.

What about you? Do you garden? What are you planning to grow this year?

Road to Building a Tiny House!

Over the past couple months I’ve been feeling like it’s really time for me to move out. But… there’s several reasons that’s not gonna happen quite yet :T. Mostly I don’t get paid enough wages to make it living on my own yet. And I probably won’t have enough saved up for a year or two.

This is really disappointing. And then I suddenly remembered Tiny Houses! A few years ago or so I’d read about the Tiny House movement, found a layout I fell in love with and so on. Then as time went on I promptly forgot all about it, it wasn’t practical for me anymore as I had other plans! Well, time kept on keepin’ on and those plans fell through. And eventually I found myself sitting here in my small room, wishing I could afford my own place. And a new plan was hatched!

If I save my pennies through the winter, I might just have enough to get a properly-sized trailer and some lumber to start with, and i could very well build my own tiny trailer house throughout the summer!

Now, I’m under no illusions about finishing said tinyhouse during the summer, in fact I don’t know if I’ll even be able to afford things as I would like to. But that’s not keeping me from plotting and dreaming and mocking things up! In fact here’s what I’ve got so far:

tinyhouselayout

I left a space for the door,  dotted lines are windows, dashes are counters/desk space.  the dotted dash is a storage chest/couch situation and the grey’d area is where the woodburning stove would go(The stove is 1’x2′ (with “accessories” that make it more 3’x2′) but the grey would be the heat-proof’d areas)  The small room in the upper left is the bathroom/shower, and that little corner hall would have the kitchen sink and counterspace and storage and so on.  The scale here is that one square is 1’sq  so the trailer would be 18ft long and 8ft wide!

So far so good yeah? I haven’t quite gotten everything figured out yet, and if necessary I can expand it to 20′ for extra utilities space.  In the next few weeks I plan to mock it out full size in the backyard in the snow (nobody’s been back there yet =u=)  and kind of go through and make sure there’s enough room. I made this purely on assumptions so it’s very possible I’m completely wrong haha.

I have low experience in building things but I have my older brother who knows a LOT and if he had the funds could probably build it in a summer haha. But he’s far away so it’s up to me! I assisted in leveling my sister’s cabinets,  rewiring her kitchen, demo-ing her bathroom, re-drywalling her bathroom, finishing bro’s gf’s room (molding and spackle) and things like that.  I’ve measured and cut lumber, spraypainted various items, and so on.

I’ve never made something entirely by myself before though. And I’ve never really like, built a wall or built anything substantial so… There’s a learning curve I’m sure but I’m mechanically minded so I’m sure I can do it! I am a little worried about the plumbing more than the electrical. Electrical I’ve been getting a good grasp on lately (also one of my friends went to school to be an electrician. She shifted and became The Teacher, but I’m sure she still knows a lot of it haha.) But Plumbing… I mean, I’m sure I can get it, I just have absolute zero experience with that. At least with electrical I helped re-wire my sister’s kitchen (and hearing my bro bitch about the other construction guys and… well… if I’ve only learned one thing it’s to do the electrical before putting up any drywall! xD)

Pops has the tools, and probably some skills as well. And Bro’s got the skills I don’t so I’m sure he can give me some guidance! Although if any of y’all have any relevant experiences or resources to share I would love to hear what you’ve got to say!

Wallet-Making Take 2

So, I didn’t have enough left of that nice thick dark leather that I was planning to make my billfold wallet out of. But I do have this lighter, thinner leather that I think would make a nice minimalist pocket style wallet.

Something like the Journeyman offered by Tanner Goods [Here] would be ideal.

Seriously go take a look at that fancy shit, it’s beautiful. Now obviously I’m not expecting mine to come out so nicely. After all this is my first time doing any sort of leatherwork really. You can’t expect to paint a masterpiece the first time you pick up a brush :U  In any case I decided to base my design off of this since it looks easy enough, and being mechanically minded as I am I figured how it’s put together pretty easily.

For my wallet, just cut up two pieces and matched them up as best I could but uh… Now I know why the pros use a hydraulic press with a cutting mold, whereas I used a metal straightedge and a box cutter. So the mirror image isn’t exactly there, close enough though.  Next I cut up two more sheets to act as the outside ‘pockets’.  One I accidentally cut horribly short  and while I realized that I could totally flip it and make a sort of sideways pocket, I opted for the lazy/minimalist option and decided that one outside ‘pocket’ was good enough for me P:

2013-08-17 17.43.35

Next came the all important part of puncturing the leather for the needle and thread to get through!

2013-08-17 17.44.12

I pulled out my awl and mowed through the bottom edge of my first big piece, using only the awl and a whack with the palm of my hand. Now I know why the pros also have either strong ass sewing machines or a the very least rawhide mallets. Ow. So then I realized that I had to make sure somehow that these would line up right with the other pieces.

For the first line I just lined up the pieces as well as I could, inside out, and stuck my sewing needle through the holes in my first piece, to lightly puncture the second piece. I would use these little holes as a reference were to place the awl and punch through.

2013-08-17 17.45.08


2013-08-17 17.45.28

You can see pretty good the difference in size of the awl holes and the needle marks. The next step was to pin the corners together using some thumbtacks pops had lying around and poke the rest of the holes to match the second piece, and then follow suit with the sides of the pockets that would get stitching.

2013-10-05 15.08.39

The thread I’m using is a durable heavyduty thread in a sort of steely silver that I’ve used in the past to stitch simple book bindings early last year (the books didn’t warrant such a thread but my mother was pretty adamant). And I think it’ll contrast nicely with the color of leather that I have. So after punching through the leather scraps, it was time to sew them together!

I did this by hand as I don’t have any kind of sewing machine at the moment, not to mention i don’t even know you can do this kind of thing with a sewing machine. The stitching may not be perfect but it’s more than strong enough to hold this thing together hopefully for a long time! Or at least long enough for me to purchase more leather and try again =D

2013-10-05 15.47.09 2013-10-05 15.47.14 2013-10-05 15.47.26


Now, unfortunately when I got to the ends I had no idea how to knot them up properly. So I just tried to wing it. But uh… That proved itself a bad idea pretty quick as one of the knots started coming undone immediately. So I resorted to supergluing the knots into place.  Next time I’ll put more research into that part =w=;;;.

It should hold for a good while though and I can re-stitch it if need be. The only thing I need to figure out now is sealing the outside edges together so they don’t pull up. I noticed when I put them in my pocket one of the layers on the corner likes to catch and pull up so I’ll have to figure out how that’s done.

But, a project  completed and I’m super pleased with the result!


Technical difficulties with analog crafts

So I had some scrap leather I purchased (though if I’d known just how ‘scrap’ it was I never would have paid money for it.) and I recently read this post by artofmanliness.com. So, having some energy and free time this evening I decided to try my hand at it! I printed out the blueprints full size and cut the D piece out of my nicest biggest scrap using a simple box cutter.  I had one of those nice fiskar self-healing cutting mats underneath it too. It started pretty well and my cuts were clean… but then I noticed something…

It was WAY TOO SMALL!

wallet1 wallet2

Now, this piece is supposed to be the outermost layer of the wallet and thus the biggest piece. When I realized that it was roughly the size of a dollar, I also realized i had made a horrible mistake.  Upon rechecking things out I found out that what I printed was pretty much completely off-scale and to top it off, after realizing this, adjusting, and checking it against my scraps again, I didn’t have any solid scraps big enough for that largest piece :T

So suffice to say I’m a bit disappointed, and I’ve added Leather to the list of things I’m going to buy when I get paid haha.

Although I’ll be checking my other pieces to see if I can’t make another type. Maybe a phone pocket slim wallet or something other than a billfold but we’ll see!

Post Navigation